Note
As of March 29, 2024, I released BSXU, which is what I consider to be the replacement of PSXU.
It adds a few things, like automatically uploading to Backblaze B2. However, it's written in Python. If a PHP implementation is what you seek, then use PSXU.
Prelude
When it comes to hosting images or files on the internet for quick sharing, there is a plethora of "free" options available, and for most purposes they are usually good enough.
However, I take issue with some practices on the most common options. Be it the possibility of files just disappearing without warning or after inactivity, or services that might suddenly start serving your images inside iframes and surrounding them with advertisements.
For this reason I've made PSXU, a simple PHP script for self-hosting that Sharex can interact with. In this post, I will teach you how to quickly set it up in your own web server.
After you've finished this guide, you will be able to quickly upload files to your own webserver through sharex, and automatically have an URL to them in your clipboard.
Prerequisites
- A web server, with a reasonable amount of space for files, and running PHP 7 or newer.
- A computer running ShareX.
- ~10 minutes of your time.
Downloading and configuring PSXU
First, you will need to pick up PSXU from its Github releases page. Simply download the Source code in ZIP form, and uncompress it in a folder.
Once done, you will find yourself with three files.
README.md- Github README file, you may delete this.psxu.php- The main script, don't modify this unless you know what you're doing.psxu_config.php- The configuration file, open it.
Inside psxu_config.php, you will find yourself with the settings. I believe the comments above each setting are self-explanatory enough, but let's go through the important ones:
$url- The URL where the uploader script will be available.$directory- The directory where files will be stored. If left empty, files will be stored in the same directory aspsxu.php.$randlen- The size in characters of the filename, which will be randomized.$secret_key- Must be a long string of letters and numbers that only you know.
Once you've changed everything to your preference, save and close the file.
Setting up the server
Simply upload the two files to your webserver, in their desired location. For the sake of obscurity, you may want to rename psxu.php to any random name.
If you decided that files should go in a directory, this is the time to create it, and ensure PHP has access to it. (usually through the www-data usergroup).
mkdir <dirname>
chgrp www-data <dirname>
chmod -R 776 <dirname>
By now, trying to access that directory should result in a '403 forbidden' message. If that's not the case, just create an empty index.php file with 'touch index.php'.
That's all as far as the webserver goes. Depending on your usage, you might want to increase the maximum allowed file upload size in PHP. If you use a managed web server, you might do this from your host's panel. Otherwise, you'll need to look into php.ini.
Setting up ShareX
Open Sharex, head to "destinations" and then Custom Uploader Settings.
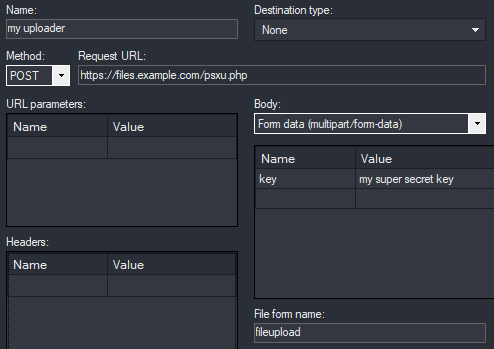
Create a new uploader, and fill in the blanks:
- Name: A name for the uploader. Can be anything.
- Request URL: The path to psxu.php (or whatever you might've called it) in your webserver.
- Method: POST
- File form name: fileupload
- Finally, add a field named "key", where the value is your $secret_key, without the quotes.
It should end up looking something like this:
Use the test buttons on the bottom left to ensure upload functions work. If they do, simply close the window, if they don't, read the error message and check the guide to make sure you did things correctly.
Finally, set your default upload settings to it in the Destinations menu.
You're done
Congratulations, you're now hosting your own file sharing. You can upload just about any file through Sharex' context menu and quickly share it with anyone in the world.
Don't forget that with self-hosting comes responsabilities. Namely, you'll have to worry about doing your own back ups if you care about not losing the files you host.
And keep in mind that while I made PSXU with the idea of using it with ShareX, its functionality is fairly generic. Any software that supports custom upload destinations will probably work all the same.